10. Make Your Own Model
Making Your Own Paper Model of the Twisted Savonius VAWT:
Using the triangle approximations, we can make a model of the twisted Savonius with some paper, cardboard and tape or glue. First, print out one of the cutout shapes from the links at the end of the page (note the standard letter paper size). Thicker paper will be harder to use but will result in a sturdier model, so you may want to use it instead of normal printer paper. When choosing which cutout to use, remember that the more sides in the approximation, the harder it will be to make but the more accurate it will be when complete. Finally, if you want an operational model that could be more easily spun by a fan, you will want to stack four sections to make a turbine with a twist of 180 degrees (each model has a 45 degree twist). Here are a few different cutouts to choose from:

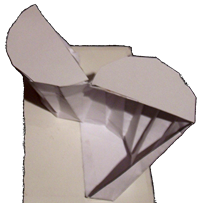
A completed 8 side model
Once you print out your chosen cutout, cut around the solid black outline of each figure (if you are using the 4 or 8 side cutout, look at where the solid/dashed lines are on the 6 side cutout). Be careful to cut around the tabs and to leave the solid thick line in the center, because these will hold the blades together in the finished model. Now, score each of the dotted lines with scissors then fold along them, starting on one side, then moving your way in. The “vertical” lines should all be folded one way and the diagonals should be folded the opposite way. When you get to the solid line in the center, switch folding directions. When you have finished folding see if you can make the model look like the Savonius blade. Fold all of the tabs in so they can fit around the top and bottom pieces of the blade (the half-regular polygons, which you should cut out separately) and attach them using tape or glue. As you work your way around all of the tabs on each piece, the creases should fold in the directions you did before. When all four tops/bottoms for the blades are in place, find the side on the center line where the diagonals meet. This will be the bottom. Attach the bottoms of the turbine to something rigid (such as cardboard) so that the two blade bottoms are directly across from each other (at a 180 degree angle). Your blades are now complete. You can add an axle and support system if you want or just leave your model like this.
If you want to know more about how the cutouts were made, click here.
| Previous |
